- Download WordPress and unzip it on the desktop
- Open the Installation Guide and log in to your Reclaim hosting account
- Reclaim has an automated installation of WordPress, but please DO NOT DO THIS. Once you know how to manually install WordPress, you’ll know how to install almost any other Content Management System or Database Management System–important job skills! We also will be able to later manipulate WordPress in ways that we wouldn’t be able to with an auto installation.
- Create a MySQL database and user from your Reclaim dashboard, add the user to the database, and write down the database/user/password combination.
- Open FileZilla (available for download here if you don’t have it on your machine) and click File>Site Manager and select ftp.yourwebsite.
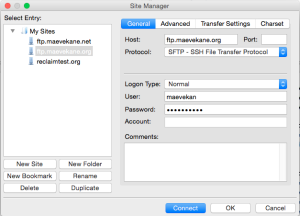
- Your settings in Site Manager should look like this:

- Use your username/password combination from the “[Reclaim Hosting] New Account Information” email you got when registering your Reclaim account. Make sure you’ve switched “Protocol” from FTP to SFTP
- We did this step at the very end of class, but if you’re working from a different machine, you’ll need to download WordPress again (step 1) and unzip it by rightclick>”extract all.” Using NotePad++ (PC) or TextEdit (Mac), open wp-config-sample.php, and edit it with your database/user/password combination. Save and close. (I prefer KomodoEdit, which is a free and open source program more specifically made for coding, but all you need for this step is a text editor that is NOT a wordprocessor. KomodoEdit is available for both PC and Mac. TextWrangler is also good and free, but only available for Mac)
- In the left panel of FileZilla, locate your wordpress file. You may need to click on Users, your account name, and then downloads, desktop, or where ever you told your browser to save to, depending on the setup of the computer you’re using. Don’t be afraid to click around and scroll through the file tree in the upper left panel to figure out where you are, you can’t hurt anything by clicking on it. Now is as good a time as any to get to know your file tree structure :)
- Once you’ve found your wordpress file, double click it until you see a long list of filenames with names like wp-trackback.php, wp-signup.php, wp-login.php, etc.
- In the right panel of FileZilla, find folder titled “public_html” and double click it. There will be a couple of files in there, but not much.
- In the left panel, select ALL of the wordpress files and drag them into the right panel into public_html. FileZilla will queue up your files and send them to Reclaim.
- When the transfer is complete, visit your website address that you registered with Reclaim and fill in the information it asks for. If you don’t get a form, email me with the specifics of what you do get. If you’re not getting a form, check out the comment thread here starting from Tervor’s comment.
- Yay! You did it! Add a link to your new blog on the class directory and make a post celebrating your accomplishments :)
- Feel free to mess around and change things. It’s your house, do what you want.
- In your Dashboard (accessible through yoururl/wp-admin), find Plugins and go to “Add New”
- Install Jetpack by selecting or searching for it. Click install and then go to Plugins>Installed Plugins, and activate Jetpack. You’ll need to create a WordPress.com account after activating Jetpack; this is different from your WordPress login info to get into your dashboard! This is a shadow account that we won’t need again for the rest of the semester, but to keep things simple, I use the same email/username/password combo for this and my dashboard login. I suggest writing this down just in case.
- Do the same with Page Links To.
- To change your theme (the public-facing appearance of your website), go to Themes > Add New in Dashboard and select one you like.
- Optional: Create a page (not a post!) for your CV/resume. I leave it up to you how much or how little you want to include. Mine is available here if you’d like to see an example.
One thought on “Setting Up WordPress”
Comments are closed.
Steps 17-20 are changed since the first class session. WordPress got an update that made adding themes and plugins much easier since I wrote the instructions last fall. If you added the plugins and theme using the old version, consider your filezilla ninja skills leveled up.